In this blog post, I am going to show you step by step how to collect email addresses and build an email list for free on your website.
The Problem:
Everybody tells you you need to build a list of subscribers and collect email addresses on your website, but nobody actually shows you how to do it step by step.
In this blog post, I’m going to show you how to build an email list for free from scratch quickly and easily.
The Solution:
Collecting email addresses on your website only takes 6 steps and it’s easier than you think.
I’m going to show you how to do it, right here and by the end of this blog post, you will have a proven battle-tested strategy to start collecting emails on your website.
How To Build An email List For FREE!
Step 1: Download My Interactive Checklist
I highly recommend you [thrive_2step id=’1889′]download my free Checklist here.[/thrive_2step]
You’ll get the entire process to collect emails on your website, even if you use WordPress and you’ll be able to follow along step by step quickly and easily.
By having that checklist at your fingertips, you’ll be able to come back to it again and again, whenever you need to.
So download that first.
Step 2: Decide On Your Objective
Before you proceed any further, you need to clearly decide on your objective.
Why do you want to collect email addresses on your website?
For some people, it might be to deliver a mini-course to prospects who request it.
For others it might be to deliver a PDF download, known as a lead magnet, to people interested in a certain subject matter.
I once knew somebody, who wanted to capture email addresses so that she could send people her Cake recipes via email.
The bottom line is, you need to be clear about your objective and why you’re collecting the email address in the first place.
Step 3: Choose a Free Traffic Source
To build an email list, you need traffic.
Traffic is an Internet Marketing phrase for website visitors.
There’s a lot’s of ways to get traffic to your website and I’m going to list out my favourite ones below:
Start a Blog
My Number 1 favorite way of getting traffic to my website is through blogging.
A blog is a website exactly like my website that you’re reading right now.
You landed on my website, probably because you did a search in Google and my website was shown to you.
I got you to this website from google and by writing this blog post.
It’s also known as Search Engine Optimization.
This is a huge topic and too big to get into here as it’s an entire topic of it’s own.
But if you’re interested in Blogging I recommend the 21 Day Day Blog Challenge click here.
And it’s my favorite free traffic source for building an email list.
Social Media Marketing
My Number 2 favorite way of getting free traffic to my website is using Social media and Facebook.
You can create a simple page on Facebook and direct people to it by sharing your page with other facebook users.
There are lot’s of popular social media sites on the internet, so you’re not just limited to Facebook.
There is also Twitter, Instagram and Reddit.
YouTube
My Number 3 Favorite way of building an email list with free traffic is Youtube.
I’ve recently been experimenting with Youtube, I don’t particularly like Youtube because I’m quite a shy person.
But You Tube is the 2nd biggest search engine in the world, after Google, in fact actually, Youtube is owned by Google.
It’s a massive source for free traffic that I’ll be doing more of in the future, but for now my main focus is blogging to build my email list for free and I recommend you start with blogging aswell.
Step 4: Sign Up For An Email Autoresponder Service
When I say “autoresponder service” I don’t mean one of those auto-response emails you set up, that automatically sends out an auto-reply email when somebody emails you out of hours.
That isn’t what I’m talking about here.
I’m talking about a proper professional service that not only sends out a sequence of email messages but ALSO has a special email capture tool built right into it.
I recommend Aweber.

This means you can set up a special form to collect email addresses directly on your website.
This form has a few names.
You might have heard it called an “opt-in form” or a “sign up form”.
Whichever name you’ve heard, they both have the exact SAME function.
That is to capture email addresses on your website.
Here’s some email sign up form examples of what these forms might look like:
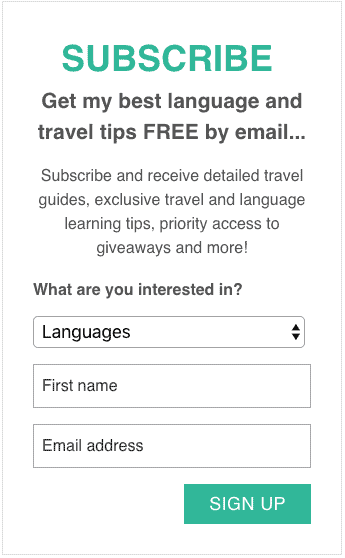

I particularly like this one from Nerd Fitness:

There is an autoresponder service that I use to create email sign up forms just like these that I highly recommend you use called Aweber.
There are others you can use, but I highly recommend you use Aweber, because it’s the easiest to use and they have a free plan.
Here’s how to sign up to aweber:
You can get a free Aweber Account here.
Once you’ve created your Aweber account move on to Step 4…
Step 5: Create Your Email Sign Up Form
By this point, you should have:
- Downloaded my interactive Checklist.
- Defined your objective.
- Chosen a free traffic source
- Signed up to Aweber and created your free account.
If you’ve completed those steps and followed along up to this point, congratulations.
And now we’re at the part where the rubber really meets the road.
It’s time to create your sign up or opt-in form inside Aweber.
Usually, this is one the hardest parts.
It can also be one of the most technically challenging parts, especially if you’re not a technical person.
Thankfully, Aweber makes this REALLY easy to do.
That’s why I recommended that you use Aweber for this.
By using Aweber, this step shouldn’t take you more than about 5 minutes.
10 minutes TOPS.
So lets get started:
Once you’ve followed these steps and created your optin form (sign up form) inside Aweber, you’re now ready to add the form to your website.
Step 6: How To Add The Sign Up Form To Your Website To Capture Email Addresses
So once you’ve created the form, here’s how to actually add the email capture form to your website.
For this, I’m going to assume you’re using WordPress.
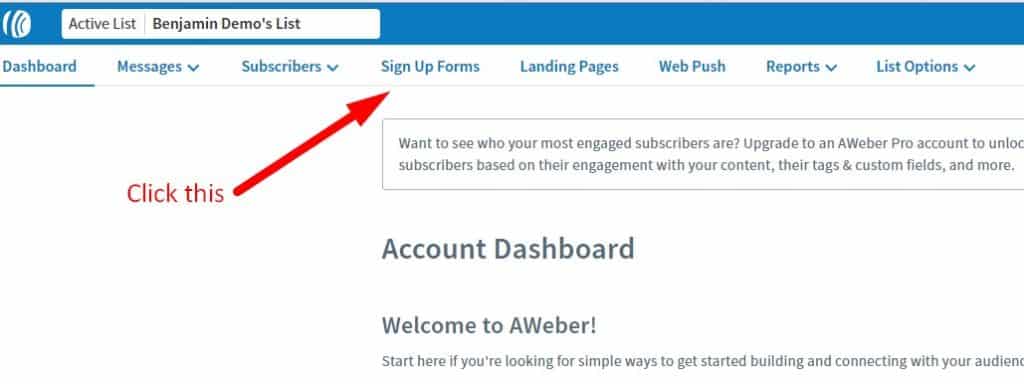
- Sign into your Aweber account and click “sign up Forms” from the Aweber dashboard:
- Choose an Aweber Sign Form Template

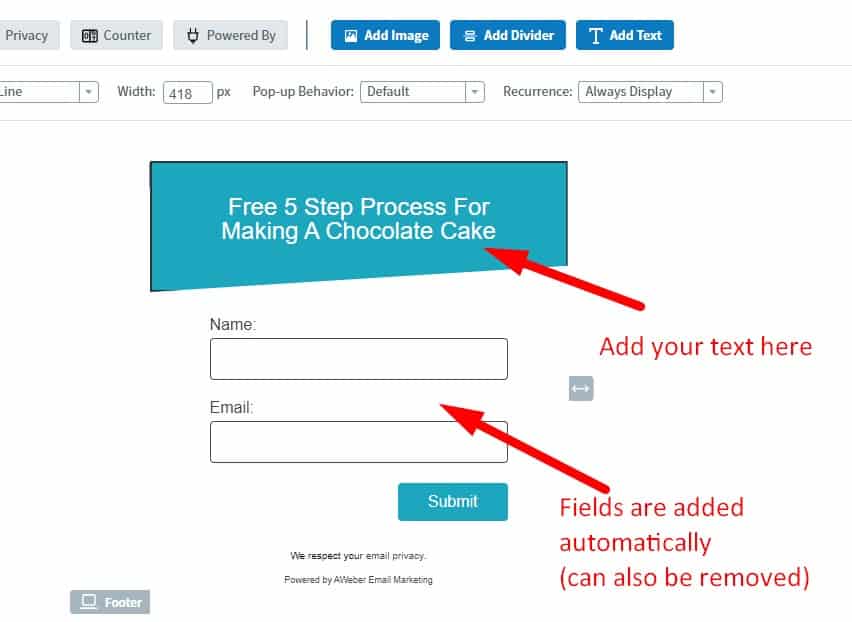
- Customize the form eg: Add your own text:
- Select Aweber’s thank you page (or use your own):
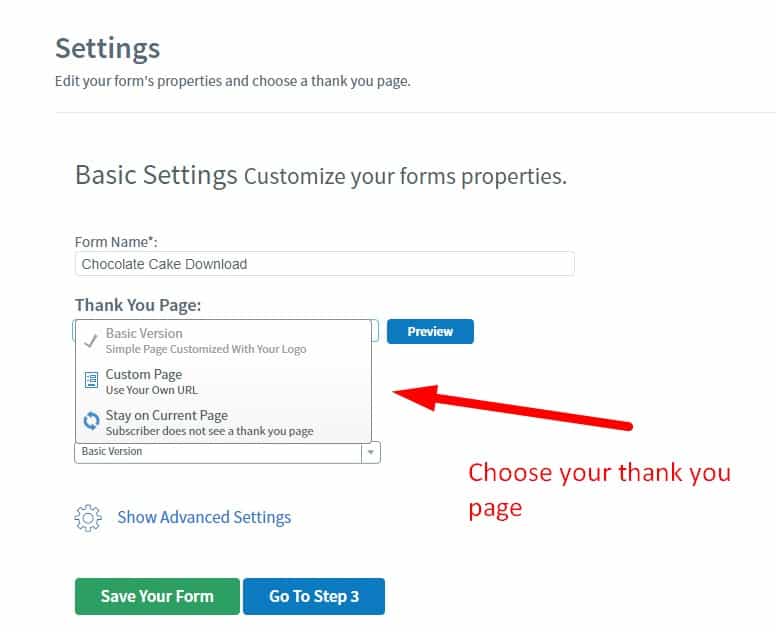
- Copy and paste sign up form code into your website:
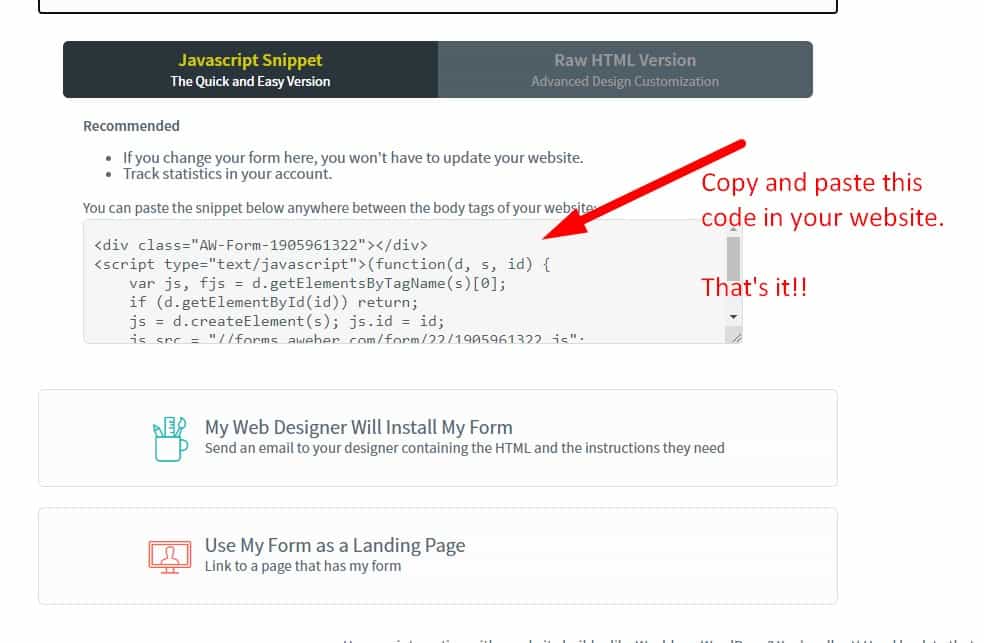
And that’s it.
Here’s a quick trick that will save you a lot of time in the future…
When it comes to embedding your email sign up form into your website, always use the Javascript version NOT the raw HTML version.
You don’t need to know how to code or anything like that, all you do is just copy and paste the code where you want the email capture form to appear in your website.
And by using the Aweber’s Javascript version of the code, any changes you make to the form in the future, will automatically update itself on your wordpress blog or website, without having to do it all again.
Here’s a video of the entire process, so that you can watch me as I do it:
Aweber free account direct link
You Can Also Use The Aweber WordPress Plugin To Build Your Email List
Aweber also have a free WordPress plugin that you can use to add your sign up to your website:

By using A wordpress plugin, it makes it even easier to collect email addresses on your website and thankfully, Aweber have their own and it works really well.
How To Get Lots of People To Submit Your Sign Up Form and Build A Big Email List
The goal of adding a sign up form to your website or blog, is to get as many people to optin to your email list as you can.
The more people on your list, the more people you can help and serve.
So here’s a few best practices for creating email capture forms that collects as many emails as possible.
Take a look at the image below.
This is a sign up offering a Photography Mini-Course:
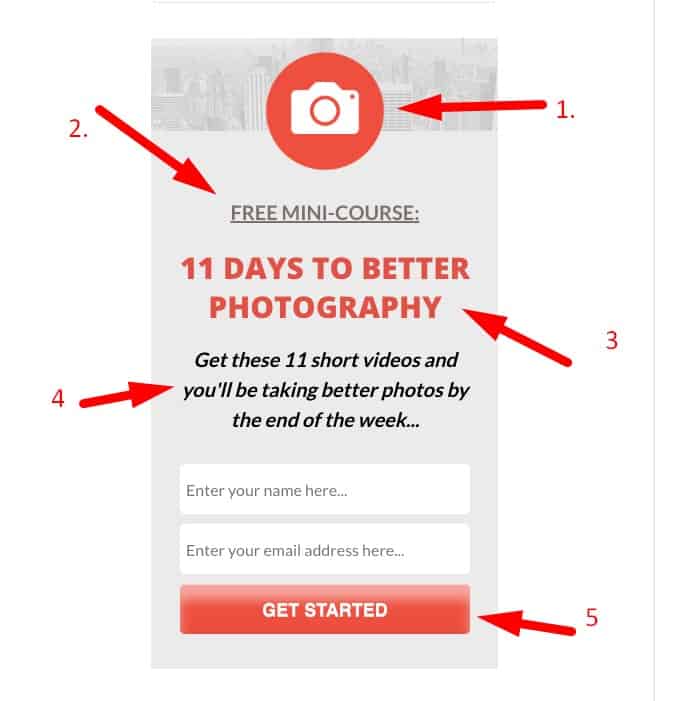
I like this one as it’s a very good example of an email optin form and it was created with Aweber.
I’ve numbered them in the picture above so that you can see each element I’m talking about.
- It has a simple image of a camera, this will immediately catch the attention of anyone interested in Photography or camera work. It conveys very easily what it’s about.
- Immediately identifies what it is being given away in exchange for their name and email address. In this example, it’s a Mini Course.
- Time focused and benefit driven headline. The value proposition here is easy to understand get’s straight to the point – that they’ll get better at Photography in 11 days. It’s one thing to say they’ll get better at Photography, but when you attach a timeline to it, it becomes much more powerful.
- Detailed specifics of what they’ll actually get. In this case it’s 11 short videos again, with the promise that the viewer will be better by the end of the week.
- The button has a strong Call to Action “Get Started”. This is better than the usual boring “submit” you see on most email capture forms.
- One additional element is the visual appeal. The layout and color s of the form is very easy on the eye.
When you consider all the things I’ve mentioned above, you can see this is a very easy thing for someone to optin to and would get a lot of email submissions.
So by following the 6 steps I’ve outlined above in this blog post, you now know how to build an email list for free easily.
Don’t forget, with Aweber, you can model all your email sign up forms like the one in the example above and watch your email list GROW!
